Installation Guide
This document contains technical information intended for professional window fitters to assist them in installing Victorian Sliders® vertical sliding sash windows.
Check the survey and goods supplied. Prior to starting any work, the installer should check the following.
- Check that the survey sheets are correct and clear.
- Check that the windows supplied are those the customer ordered and are undamaged.
- Check the glass type and pattern are correct.
- Check the window and glass size are compatible.
- Check all ancillary profiles and trims are correct.

Checking Frame to Opening:
- Place frame in the prepared window opening.
- Maintain a 3mm gap between sashes and frame for proper window operation.
- Plumb and level the window frame using a spirit level.
- Use temporary wedges to hold the frame in position.
- Adjust wedging for vertical and plumb jambs.
- Check diagonal measurements and squareness of head and cill.
- Verify stiles are not bowed.
- Bed cill on suitable mastic, do not drill through.
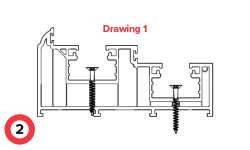
Fixing through Frame:
- Fix outer frame in two positions, see drawing
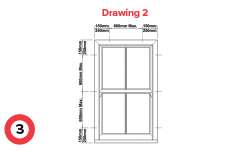
- Fixing should be between 150mm and 250mm from corners with maximum centres of 600mm, see drawing 2.
- Use countersunk head screws for fixing.
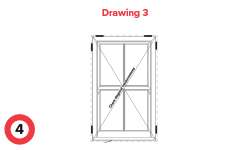
- Pack frame at screw positions with shims before final tightening
- Avoid over tightening to prevent frame distortion, see drawing 3.
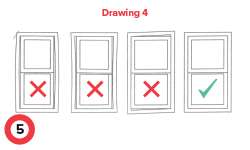
- Ensure outer frame is not bowed, maintain 3mm gap between sashes and frame, see drawing 4.
- Use expanding foam only as a gap filler, not an alternative to mechanical fixings.
- Check for frame distortion after fitting, clear debris and drainage paths.
- Remove protective tape as soon as reasonably practical.
Installation using fixing brackets.
Attach fixing brackets to stile, head and cill, in accordance with manufacturer’s instructions.
Positioning them at 150-250mm from each corner. For bigger windows, more brackets may be required for bigger windows.
Ensuring that the fixing points do not exceed 600mm apart. Frame fixing brackets are available in the following lengths - 175mm, 200mm, 250mm and 300mm.
Place the frame in the window opening. Maintaining a 3mm clearance gap between the sash’s outside and the frames inside.
Plumb and level the frame using a spirit level and wedges.
Drill through the fixing bracket holes and secure the vertical corner brackets.
Final Checks.
-
Check the diagonal measurements of the frame and ensure the head and cill are square.
- Use a straight edge to check for any bowing in the stiles.
- The cill should be bedded on a suitable mastic.
- Before final tightening, pack the frame at screw positions with shims. Avoid over tightening fixing screws to prevent frame distortion.
- Ensure the outer frame is not bowed for optimal weather performance and sash operation.
-
Expanding foam should only be used as a gap filler and not as an alternative to mechanical fixings. Remove debris, contaminants, and clear drainage paths. Remove protective tape as soon as possible to prevent difficulty in removal due to aging.
Although reasonable care has been taken in the compilation of this document, Victorian Sliders® do not accept any liability for damage resulting, whether directly or indirectly, from the use of the information provided. Accordingly, this document is supplied on the basis that the user accepts all risks associated with the task in hand.
The procedures in BS 8213-4 2016, Code of Practice for the survey and installation of windows, or any subsequent updates following this document should be followed at all times.